On a happy Sunday, it may turn out that one of the servers I manage suddenly runs out of space and I have 4 missed calls when I am in the bathroom. The last time that happened was because the server ran out of space and the applications running on it stopped responding.
So, in an effort to not let that happen to you (or me), I bring you this article. We are going to create a shell script that sends a “disk space alert” email. You will know the hour when your server starts to fill up and goes past some set warning level. This guide shows you how to set all that up and explains everything you need to know in order to modify things to suit your situation.
What You Will Get At The End Of This
Well, any time your server’s disk space gets dangerously full, you will get an email like this hitting your inbox.

As you can see, it is an HTML email with all the relevant parts made bold and highlighted with a red color.
The Shell Script
So, let me give you the shell script first. Below I will explain all the things you need to know in order to understand how the shell script works. If you know bash scripting, maybe the shell script below will be all you need.
#!/bin/bash

# Who should get the email
EMAIL_TO="email1@gmail.com,email2@livefiredev.com"

# Where the email is going from
EMAIL_FROM="fromwho@livefiredev.com"

# Getting the current percentage utilized
# on the drive mounted at "/"
PERCENTAGE_UTILIZED=$(df | awk '$6 == "/"  {print}' | awk '{print $5}' | grep -Po '\d+')

# Any % Utilization Greater than this warning level will
# trigger an email
WARNING_LEVEL=80

# Check to see if percenage utilization is
# more than the warning level
if test $PERCENTAGE_UTILIZED -gt $WARNING_LEVEL
then

# Construct the email Body
read -d '' EMAIL << EOF
To: $EMAIL_TO
From: $EMAIL_FROM
MIME-Version: 1.0
Content-Type: text/html; charset=utf-8
Subject: The machine $(hostname) is running out of space.

Hi,<br />
Please note that the disk usage % on <b>$(hostname)</b> is at <span style="color:red;"><b>${PERCENTAGE_UTILIZED}% level</b></span>.<br /><br />

The <b>warning level set is ${WARNING_LEVEL}%</b>. Please look into the same urgently.<br /><br />

Kind Regards,<br />
$(hostname) Bash Script
EOF

    # Finally send of the email via SSMPT
    echo "$EMAIL" | ssmtp $EMAIL_TO
fi
The code above is heavily commented so it should be clear what each part is doing. Right on top, you should be able to see all the settings you need to change.
The settings you need to change are as follows:
- EMAIL_TO: Here you can put in comma-separated email IDs. These are the email IDs that will get the “alert email”
- EMAIL_FROM: This is who the email is going to go from. In order to set this up properly, you will need to see the section below about: Using ssmtp To Send The Email
- WARNING_LEVEL: This is the trigger level. This is in percentage. For example: If you write 50 here, it will mean that when more than 50% of the space is utilized on the server, you start to get the alert emails.
Things You Will Need To Install To Make It Work
A fresh Ubuntu install should be able to run most of this script directly. You will only have to install one program: ssmtp
Now, the details on how to configure to use ssmtp in order to send email from the command line have been covered below. See the section titled: “Using ssmtp To Send The Email”
To install ssmtp, that can be done like you would any other program:
> apt-get install ssmtp
Understanding Each Line, So That You Can Modify As Needed
Below we will start to dissect the above script. At the end of the explanation, you should be able to modify it to suit your needs and situation.
The “df” Command
On line 11, we figure out the % utilized. And that starts with using the “df” command.
According to Wikipedia:
df (abbreviation for disk free) is a standard Unix command used to display the amount of available disk space for file systems
– From Wikipedia
Here is the official user manual of the “df” command.
This is a command that you might have used before. If you type it out on the terminal in your VPS, you might get an output that looks like this..
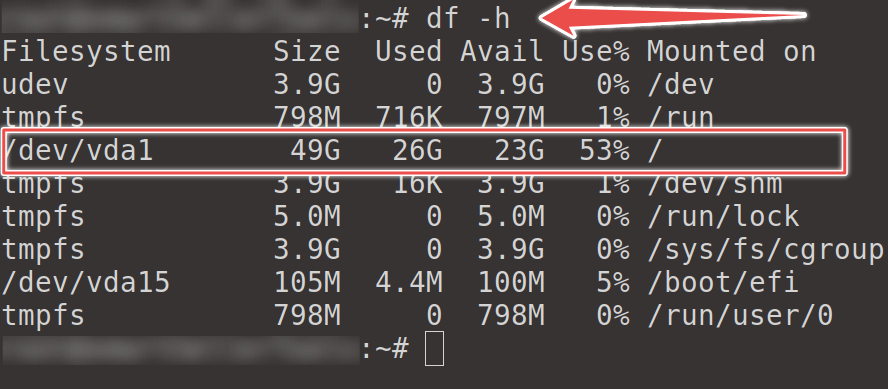
In the above case, I have added the “-h” flag so that the result is “human-readable”. The sizes of the disks etc are given in GB in the above output. This is not important from the perspective of our shell script. But, I have mentioned it here since this is usually how the command is used.
The red box shows the main disk where all the applications and user data etc. are stored. It shows that the drive size is 49GB in total. Out of which 26GB is used. So, its 53% used. That 53% is what we will use to check if the usage is crossing the warning level.
In the next step, we are going to use the “awk” program to extract this usage percentage and save it in a variable.
The “awk” Program
awk is an interesting program. What it does is hard to explain. But still, I will try.
What is awk good for?
You can use awk to read and extract information out of multi-line data (like the output of the df command). awk will split the data into lines and split the lines into parts and allow you to zone in on the part that you care about. It allows you to do all this with just a single line. If you were to do this with another language, it would involve a few nested loops.
awk is a whole programming language. Here is a very large and detailed guide on the subject.
Also, check out this video from one of the creators of awk to get a sense of what it’s good for.
An awk Crash Course
This is the best crash course video I could find on the subject..
So, if you have seen the above, let me start to break down how we extract the percentage utilized value from the output of the “df” command.
The whole line is:
PERCENTAGE_UTILIZED=$(df | awk '$6 == "/" {print}' | awk '{print $5}' | grep -Po '\d+')
We go part by part.
Part 1: Getting The Line We Want
If you just type out the first part, you should get an output like below:
$> df | awk '$6 == "/"  {print}'
/dev/vda1       50620216 26793604  23810228  53% /
What’s going on:
- We are just taking the output from “df” and “piping” it into “awk”
- We tell awk: “As you go through it line by line, you will come across a line where the thing in the 6th column (columns broken up by spaces) will be ‘/'”
- Please “print” that whole line
Note: If you do not want to check the drive mounted at “/”, but some other drive, this is the place to modify it.
Part 2: Getting The Percentage Utilized Value From That Line
Now, we are going to take the output we got and again pass it into awk. This time, we simply tell awk, give me whatever is in the 5th column. Basically the percentage utilization.
Below is the line and the output you will get on the terminal.
$> df | awk '$6 == "/"  {print}' | awk '{print $5}'
53%
Awesome, we have the % utilization. Its at 53%.
At this point, we are done with awk. Now we just want to get rid of that “%” symbol. We do that with grep.
The “grep” Program
Grep basically allows you to print lines that match patterns. So, we are going to give it a regular expression pattern for a number: “\d+”. It will match the part that looks like a number and print it. That is all.
grep is also a very powerful tool. You can learn about it here.
So, if we put the full line in the terminal, let’s see what we get:
$> df | awk '$6 == "/"  {print}' | awk '{print $5}' | grep -Po '\d+'
53
There are 2 options used in the above grep command.
- The “P” option tells grep that the pattern being given is a regular expression.
- The “o” option tells grep that we want to just print the matching part and nothing else.
In case you are confused about what a “regular expression” is and what the “\d+” means, you should check this out.
Storing The Result Of The Bash Command In A Variable
Well, the syntax for doing this is simply to wrap the command in a $(). So, finally to store the result of the whole command in the variable: PERCENTAGE_UTILIZED we do:
PERCENTAGE_UTILIZED=$(df | awk '$6 == "/" {print}' | awk '{print $5}' | grep -Po '\d+')
Using if statements in Bash
There are now 2 variables. WARNING_LEVEL and PERCENTAGE_UTILIZED. We need to compare them. If PERCENTAGE_UTILIZED is more than WARNING_LEVEL we need to send the email.
So, we can do this in Bash with an if statement like so:
if test $PERCENTAGE_UTILIZED -gt $WARNING_LEVEL
then
  # Send The Email Here
fi
So, there are 2 parts to this. The “if” statement syntax. Which should be easy enough to see. But, besides this, we have also used the “test” command to check if PERCENTAGE_UTILIZED is greater than WARNING_LEVEL.
The test command
test is its own bash command. You can learn more about it here.
The test command does not give an output directly on the command line like “grep” or “awk” we have seen before. But, it sets an “exit code” after it runs. The “exit code” is just a way for a program that just finished running to say: “Yes, I did run successfully and then shut down”. This is usually done with exit code “0”.
A program could also have an exit code that is NOT 0. This usually means that something is not right. You can learn more about exit codes here.
Since the exit code, is not printed on the console, you can use “echo $?” to print the last exit code.
Lets try out the test command to check which number is bigger and look at the exit codes. You can type the following things on your console in order to see the results.
$> test 20 -gt 10
$> echo $?
0
So, here you can see, that first the test command runs. Then we check what the exit code was and it turns out to be “0”. 0 in this case means true.
Next, lets do the opposite:
$> test 5 -gt 10
$> echo $?
1
So this time, since 5 is not greater than 10, the exit code is 1. 1, in this case, means false.
If you revisit the “if statement” above, things should now make sense. The if statement reads the exit code from the test command and then decides how to proceed.
Using SendGrid To Get A Free SMPT Server For Email Sending
If you already have an SPTM email provider, you can probably skip this part. But, in the next step, we are going to need an SMTP server with a username and password.
There is a free plan, which makes it available to everybody, hence I have selected this service:

You will need to do 2 things after you create a new SendGrid account:
- Set up domain authentication. Detailed guide by SendGrid here.
- Create an API key (which will be your password to send email): Guide by SendGrid here
NOTE: Please Create An API Key With Min Permissions
One thing that the above doc about creating an API key lacks is that it does not guide you to create an API key with the lowest amount of abilities or permissions. So, here are some screenshots to show you what is involved in doing that. It’s pretty point-and-click and easy to understand. But, just wanted to show you all the relevant settings and options.


At the end of this process, you should have an API key. It should look something like the below screenshot. Save it somewhere. You are going to need it for the next step.

Using ssmtp To Send The Email
Okay, now you have everything you need in order to set up ssmtp. We are going to use ssmtp to send emails from the command line. So, let’s get started.
Step 1: Install ssmpt
Well, this part is easy enough.
$> apt-get install ssmtp
Step 2: Set Up ssmtp To Send Email (SMTP Server Settings Etc)
I am going to assume that you are using SendGrid here. If you are using some other SMTP server, you need to update the settings as needed.
So, in order to edit the ssmtp config and settings, you need to type in something like the below line in the console.
$> sudo nano /etc/ssmtp/ssmtp.conf
That should open up the ssmtp conf file in nano and it should look something like this..

Now, you can update the conf file to something like this:
mailhub=smtp.sendgrid.net:587
AuthUser=apikey
AuthPass=SG.ZGP0XWCh_YOUR_KEY_FROM_LAST_STEP_HERE_Gd8uuGU
UseTLS=YES
UseSTARTTLS=YES
rewriteDomain=youremaildomain.com
FromLineOverride=NO
Note that your username is “apikey”. The AuthPass is the API key we got in the last step. If you are using your own SMPT server, you will have to update the details as per that.
Once you update the file, you can save it.
To understand what each of these conf file settings means you can refer to the docs here. Here is a table with the same details.
| Option | Meaning |
|---|---|
| Mailhub | The host to send mail to, in the form host | IP_addr [: port]. The default port is 25. |
| RewriteDomain | The domain from which mail seems to come. |
| Hostname | The full qualified name of the host. If not specified, the host is queried for its hostname. |
| FromLineOverride | Specifies whether the From header of an email, if any, may override the default domain. The default is ‘no’. |
| UseTLS | Specifies whether ssmtp uses TLS to talk to the SMTP server. The default is ”no”. |
| UseSTARTTLS | Specifies whether ssmtp does a EHLO/STARTTLS before starting SSL negotiation. See RFC 2487. |
| TLSCert | The file name of an RSA certificate to use for TLS, if required. |
| TLSKey | The file name of an RSA key to use for TLS, if required. |
| TLS_CA_File | A file of trusted certificates for validating the server, if required. |
| TLS_CA_Dir | A directory of trusted certificates for validating the server, if required. |
| AuthUser | The user name to use for SMTP AUTH. The default is blank, in which case SMTP AUTH is not used. sent without |
| AuthPass | The password to use for SMTP AUTH. |
| AuthMethod | The authorization method to use. If unset, plain text is used. May also be set to ‘cram-md5’. |
Once you have saved your file, you can use the script below to test things out and see if you can actually trigger emails from the command line.
Step 3: Test ssmtp With A Script
Create a new file called “test_ssmtp.bash” with the following code..
EMAIL_TO='from-email@gmail.com'
EMAIL_FROM='to-email@livefiredev.com'

# Construct the email Body
read -d '' EMAIL << EOF
To: $EMAIL_TO
From: $EMAIL_FROM
MIME-Version: 1.0
Content-Type: text/html; charset=utf-8
Subject: This is a test email to see if ssmtp is working

Hi,<br />
This is a <strong>test email</strong> to see if ssmtp is working properly.<br /><br />

Kind Regards,<br />
$(hostname) Bash Script
EOF

# Finally send of the email via SSMPT
echo "$EMAIL" | ssmtp $EMAIL_TO
Update the file as needed. The email form and to etc. Then execute the script by running:
$> bash test_ssmtp.bash
In a few seconds, an email should get sent. And you should have the email pop-up in your inbox. (Check promotions and Spam etc, if you cannot find it)
So, at this point, all of the lines in the original shell script I shared above should be clear. So, all you need to do is make the shell script executable and then run it once every hour.
Setting Up A Cron Job To Trigger The Bash Script Once Every Hour
Making the script executable is a simple one-line of code:
$> chmod +x ~/path/to/script.bash
And then you just need to create a cron job that calls the script once every hour. As you know, cron allows you to run a particular script at a decided frequency. For example: Once an hour. Or every 15 mins. If you are not super confident about Cron syntax, here is a nice cron cheat sheet.
We are going to use the “once every hour” line:
0 * * * * /path/to/script.bash
So, in order to add it to cron, we can type in:
$> crontab -e
This should open up the cron config file. Add the line above at the bottom of the file. And then you are done. Save the file and exit. If you want to test if its saved you can try: crontab -l
That is all. Your script should run once every hour and see what is going on.
Note: It could happen that your server gets full in the night and you wake up to 8 emails. The script will keep sending alert emails once every hour until the issue is resolved.
TIP: Just to have the peace of mind that the script is indeed running and checking things, you might want to drop the WARNING_LEVEL setting down to 10 or so for a few hours. Once you get a few emails, you can move it back up to 80 or so.
Conclusion
So, that is everything. Now you know how to set up a shell script for “disk space alert”. With a little modification, you can probably monitor other things like memory etc. Hope you found this useful.